
Shopify Custom Product Configurator: Apps vs Custom Development
Learn how to build a Shopify product configurator using native features, product option apps, or custom development. Covers variants, engraving, bundles, 3D previews, and pricing.
Last updated:
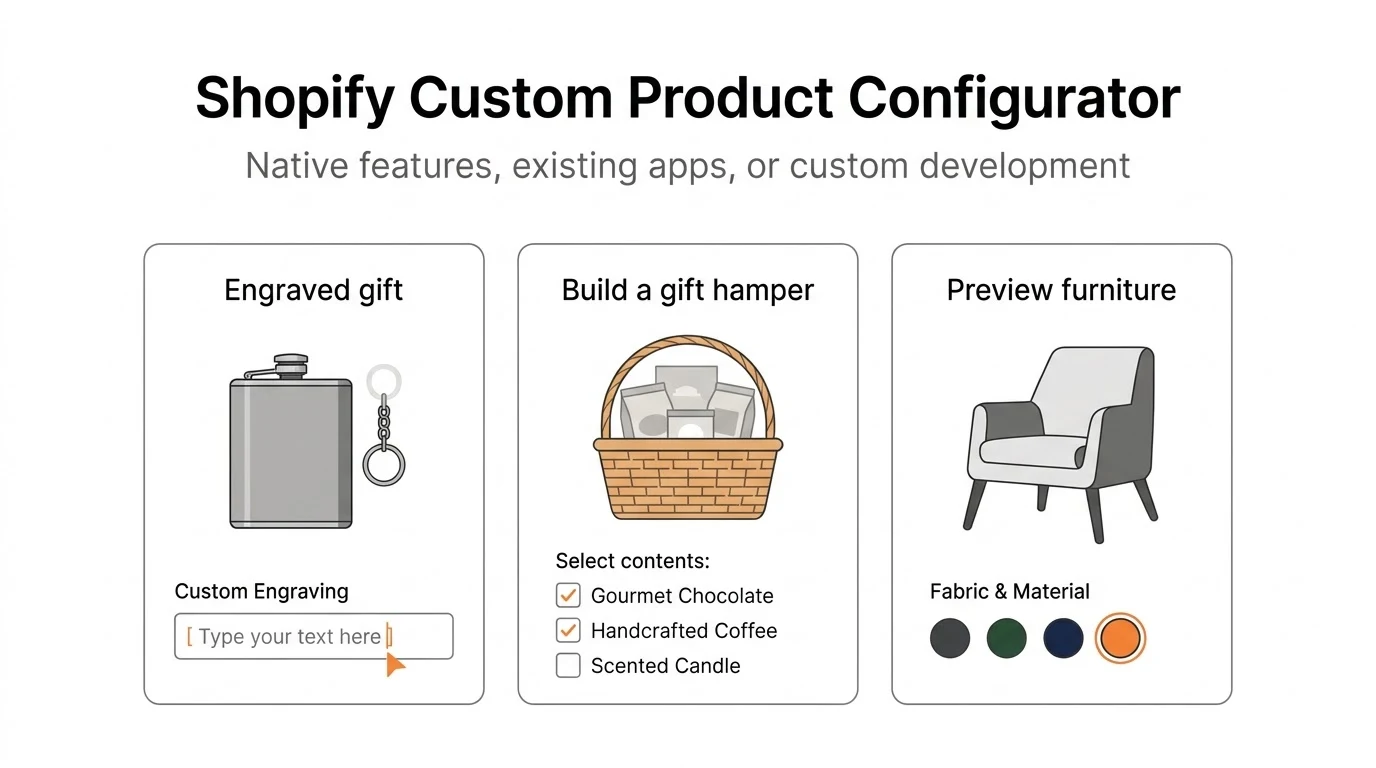
Shopify gives you what you need to sell most standard products. You can create variants, track inventory, add product information, and control how the product appears on your store. The setup gets more involved when customers need to tell you how to make the product before they buy it.
Suppose you sell personalized gifts. You need a field where the customer can enter a name for engraving. Now suppose you sell furniture and the customer needs to pick the material, dimensions, color, and accessories while watching a live 3D preview update. Shopify's default product settings can only take you so far in either case.
A Shopify custom product configurator extends what the product page can do. It can let a customer pick extra options, enter their own information, preview the changes, or build a product from a set of choices.
How you set it up depends on what the customer needs to do. You can handle some of it in Shopify Admin. An existing Shopify App Store app can cover other requirements. When neither can handle the flow your store needs, custom development may make sense. Let's go through the common types of configurators and how I would choose between those approaches.
Different Types of Shopify Product Configurators
If all you need is an engraving field or a way for customers to select an extra accessory, that already counts as product customization. The same term also covers a 3D product builder, but those features need very different implementations.
These are the requirements I would start with:
- Let customers make more choices than Shopify's native product options allow.
- Collect custom properties based on what the customer needs.
- Create fixed, mix-and-match, or configurable bundles.
- Add a feature such as engraving, image uploads, or a 2D or 3D preview.
- Apply special pricing rules or combine discounts for configured products.
Each of these puts a different demand on Shopify. Before you install an app or hire a developer, check how Shopify handles products, variants, and the properties a customer picks. That tells you where each choice needs to go.
1. How Do You Add More Product Options?
Shopify allows up to three native options and 2,048 variants per product.
Color, Size, and Material are examples of options. A variant is one specific combination of the values from those options.
Suppose you sell a chair that the customer can configure with these choices:
- Material: Wood, Metal
- Color: Black, White
- Size: Small, Medium, Large
- Cushion: Standard, Premium
- Leg Style: Straight, Curved
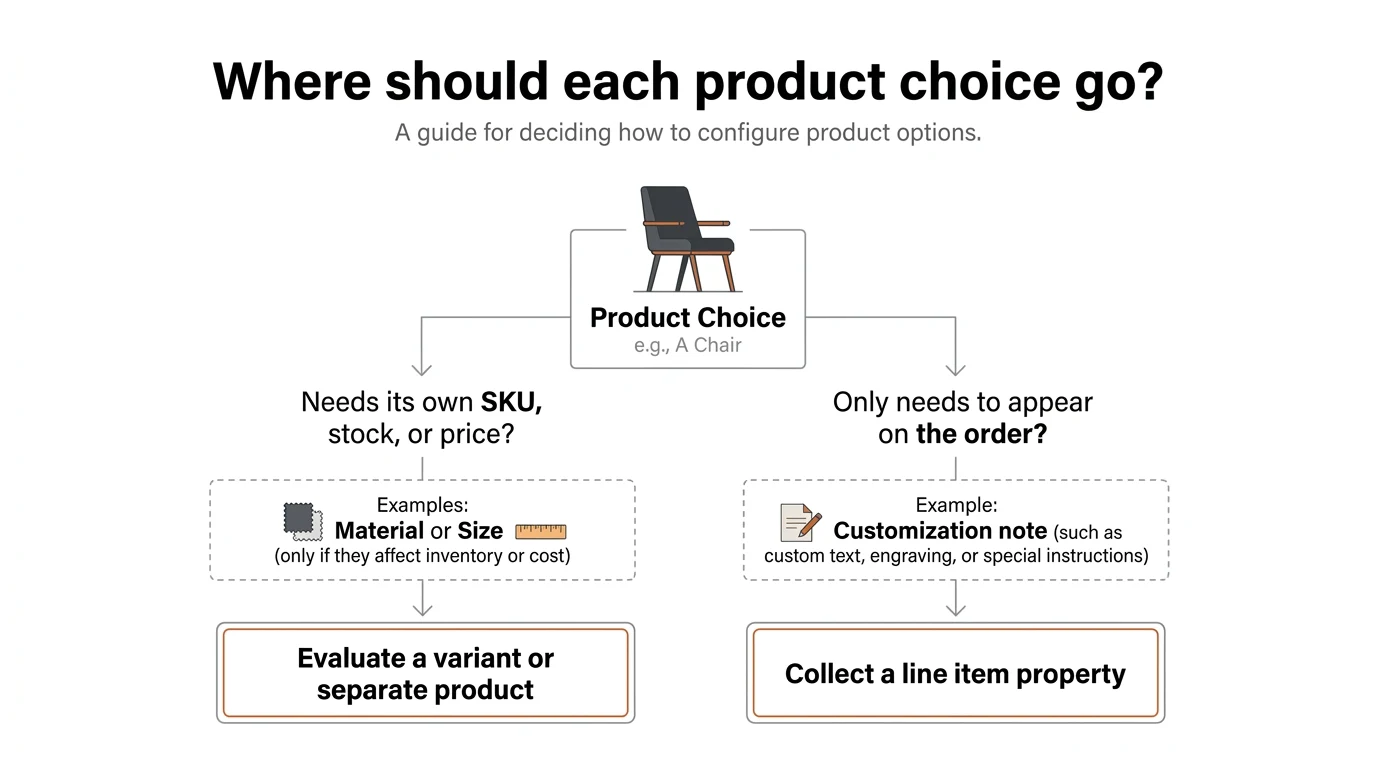
The customer has five choices to make, but Shopify gives you three native product options. So before deciding how to add the other choices, check what each choice needs to do.
Does the choice need its own SKU, inventory, weight, or price that you manage independently? If so, you may need a real variant or a separate product for it. If all you need is the customer's answer alongside the product, you can capture that with a line item property. That way, you don't have to turn every possible answer into a variant.
Option 1: Use an Existing Shopify App
If the requirement is to add more fields to the product form, I would start by testing an existing Shopify app. For most stores that need extra fields, there is little reason to build the whole configurator from scratch first.
I would look at these two apps:
Variant Option Product Options
Relentless Apps makes this app. It supports additional product fields, color swatches, text boxes, conditional logic, and price add-ons tied to options. I would consider it if you need extra choices, a field for engraving, or more control over how the customer fills out the product form.
Easify supports custom fields, image uploads, conditional options, live previews, and ways to customize pricing. If the customer needs to upload an image, see a preview of their personalization, or work through a more advanced set of options, I would evaluate Easify first.
You can find both apps on the Shopify App Store. The extra options they add do not automatically become native Shopify variants, so check how the app handles inventory and paid add-ons. Test what shows up in the cart and the order, and check that the app works with your theme.
I would also check the official App Store listings for the current subscription plans and test the features available to you.
Option 2: Shopify Combined Listings
If your store is on Shopify Plus or an eligible enterprise plan, you can use Shopify's Combined Listings feature. It connects separate products under one parent listing so the customer can move between them from a shared listing.
Suppose you sell shoes and want each color to have its own product page, image gallery, and description. You can create a separate product for each color, then use Combined Listings so the customer can switch between colors from one listing. Each child product can still have its own variant options.
The setup works because those are separate products. It does not give you unlimited fields on a single product. I would use Combined Listings if the choices should have their own product information and inventory, but you want shoppers to browse them together. If you only need to add a few fields, an options app is usually easier to set up.
Check compatibility before you decide. Combined Listings has restrictions, including limitations involving bundles and subscriptions.
Option 3: Custom Development
I would consider custom development when the customer needs a product interface that the available apps cannot provide.
For example, a furniture store might let customers pick dimensions, materials, and accessories, see the preview update, and send the resulting manufacturing instructions to another system. A developer can put that together using Shopify Liquid, JavaScript, line item properties, metafields, and APIs where needed.
Shopify's native product and variant limits still apply when you build your own interface. You have to decide how Shopify or the external system will store each choice. It could map to a variant, a bundle component, a custom property, or an external order record.
2. How Do You Collect Custom Properties From a Customer?
Sometimes you need the customer to give you a little more information before they add the product to the cart. Here are a few examples:
- The customer's name for engraving.
- A message to put on a greeting card.
- Special instructions for delivery.
- Measurements for made-to-order clothing.
- A date the customer selects or other details about the customization.
Shopify gives you line item properties for this. The customer submits the extra information with the product, and Shopify can attach it to that cart line and carry it through to the order.
What About Metafields and Metaobjects?
Metafields and metaobjects are useful here, but they handle a different part of the setup.
Metafields store extra information on Shopify resources such as products and variants. Metaobjects let you create structured content you can reuse. A list of materials, finishes, or product specifications can be set up this way.
For example, a furniture store could use a metaobject to keep the name, description, and image for each fabric. The product page can read that information and display the fabrics as choices.
The remaining step is to save the customer's choice. A metafield or metaobject can supply the information you display, but it won't automatically put the selected fabric on the order. To do that, submit the selection through a line item property or a custom integration.
How to Add an Engraving Field to a Shopify Theme
Suppose you sell personalized gifts. The customer should be able to choose whether to add engraving, type the engraving text, and see a simple preview before adding the product to the cart.
You can build this in a Shopify Liquid theme without installing a separate app. This example uses Shopify's existing product form to submit the engraving text as a line item property.
Step 1: Locate the product form
Start by duplicating your live theme so you have somewhere safe to test the changes.
Open the theme code and find the form the product page uses. The file will depend on your theme, but the product form will usually look something like this:
{% form 'product', product %}
  <input
    type="hidden"
    name="id"
    value="{{ product.selected_or_first_available_variant.id }}"
  >

  <!-- Product options and add-to-cart button -->
{% endform %}
Keep the form that is already in your theme. The example is simplified, and the existing form may already handle variant selection, availability, AJAX cart updates, and dynamic checkout. For this feature, you only need to add the engraving controls inside that form.
Step 2: Add the engraving interface
Create a snippet named product-engraving.liquid and paste in the following code:
<div class="product-engraving" data-product-engraving>
  <label class="product-engraving__toggle">
    <input
      type="checkbox"
      data-engraving-toggle
    >
    Add personalized engraving
  </label>

  <div
    class="product-engraving__fields"
    data-engraving-fields
    hidden
  >
    <label for="engraving-{{ section.id }}">
      Engraving text
    </label>

    <input
      id="engraving-{{ section.id }}"
      type="text"
      name="properties[Engraving text]"
      maxlength="24"
      placeholder="Enter your text"
      autocomplete="off"
      data-engraving-input
      disabled
    >

    <p>
      Preview:
      <strong data-engraving-preview>
        Your text will appear here
      </strong>
    </p>
  </div>
</div>

<style>
  .product-engraving {
    margin: 1.25rem 0;
  }

  .product-engraving__toggle {
    display: flex;
    align-items: center;
    gap: 0.5rem;
    cursor: pointer;
  }

  .product-engraving__fields {
    margin-top: 1rem;
  }

  .product-engraving__fields[hidden] {
    display: none;
  }

  .product-engraving__fields label {
    display: block;
    margin-bottom: 0.5rem;
  }

  .product-engraving__fields input {
    display: block;
    width: 100%;
    padding: 0.75rem;
    border: 1px solid #999;
    border-radius: 4px;
    margin-bottom: 0.75rem;
  }
</style>

<script>
  (() => {
    const script = document.currentScript;
    const form = script.closest('form');

    if (!form) return;

    const container = form.querySelector(
      '[data-product-engraving]'
    );

    if (!container) return;

    const toggle = container.querySelector(
      '[data-engraving-toggle]'
    );

    const fields = container.querySelector(
      '[data-engraving-fields]'
    );

    const input = container.querySelector(
      '[data-engraving-input]'
    );

    const preview = container.querySelector(
      '[data-engraving-preview]'
    );

    if (!toggle || !fields || !input || !preview) {
      return;
    }

    function updateEngraving() {
      const enabled = toggle.checked;

      fields.hidden = !enabled;
      input.disabled = !enabled;
      input.required = enabled;

      if (!enabled) {
        input.value = '';
      }

      preview.textContent =
        input.value.trim() || 'Your text will appear here';
    }

    toggle.addEventListener(
      'change',
      updateEngraving
    );

    input.addEventListener(
      'input',
      updateEngraving
    );

    updateEngraving();
  })();
</script>
Step 3: Render the snippet inside your product form
Find the Add to Cart button in the existing form and render the snippet before it:
{% render 'product-engraving' %}
Make sure this line sits inside the form that submits the selected variant to Shopify.
What Happens When the Customer Adds Engraving?
Once the customer turns on engraving, the text field appears. As they type, JavaScript uses textContent to update the preview. The browser treats what they entered as text, so it won't interpret it as HTML.
When the form is submitted, this input name tells Shopify to receive the engraving value as a property:
name="properties[Engraving text]"
Shopify stores the value as a line item property with the selected variant. If the customer turns engraving off, the script disables the input, so the browser leaves it out of the form submission.
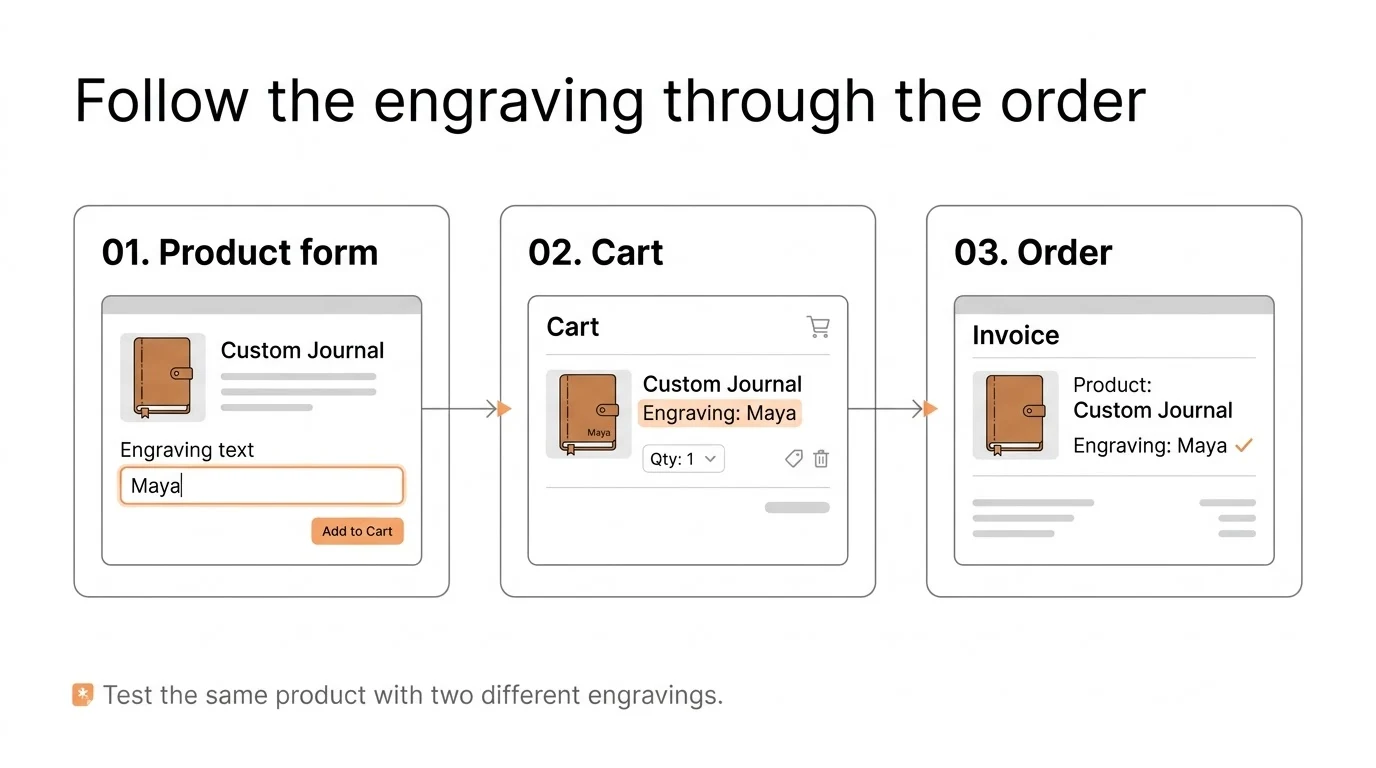
This is enough to collect engraving text and show a basic text preview. If you need to render the text on the product image, produce artwork for manufacturing, or charge a different price, those are separate pieces of work.
The example uses a 24-character limit. Set the limit according to what you can actually produce, and validate the engraving instructions before fulfillment.
Important: Test the same Add to Cart flow your customers use, including the cart drawer, cart page, and checkout. Some themes replace the product form dynamically. If yours does that, you may need to run the initialization as part of the theme's JavaScript lifecycle. Paid engraving or restrictions that the server must enforce also need more than this frontend code.
If all you need is a simple personalized message, the theme can handle it and you may not need an external app.
See the Shopify product templates and line item properties documentation.
3. How Do You Set Up Different Types of Bundles?
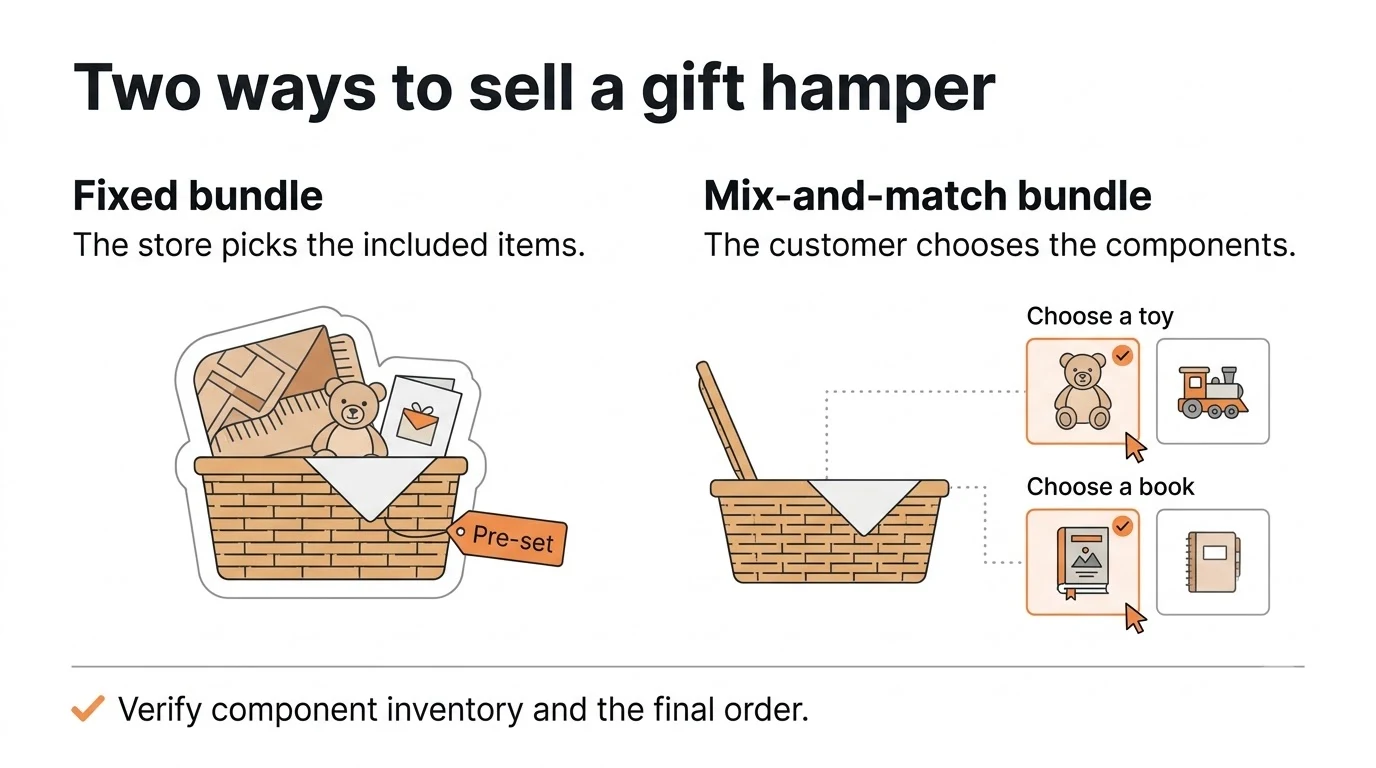
Bundles are another common reason for adding configuration to a Shopify store. A bundle lets the customer buy several related products together. The store can decide which products are included or let the customer select their own.
Suppose you sell a baby gift hamper with a blanket, a toy, a greeting card, and a few other accessories. How I would implement it depends on whether the customer buys that set as it is or gets to choose what's inside.
Fixed Bundles Using Shopify Bundles
Shopify has a free first-party app called Shopify Bundles. It is available on Shopify plans and handles fixed bundles and multipacks.
If the hamper contains a predefined set of products, I would start there. The bundle stays connected to the products that make up the set, so Shopify can handle inventory for the underlying components.
The app has limits. If the customer needs to assemble their own hamper from several choices, you need a mix-and-match setup.
Mix-and-Match Bundles
Suppose you want the customer to pick these parts of the gift hamper:
- One toy from the toys you have available.
- One book from a selection of books.
- A personalized card.
- The packaging they prefer.
- Any extra products they want to add.
Here, the customer is configuring the bundle. Look for an existing bundle app that lets customers pick the components and can handle the inventory and pricing rules you need. If the rules are fairly standard, I would test an app before building the feature yourself.
Custom development can make sense when the rules get more complicated. For example, the bundle might include products from different warehouses or need to send different components to separate manufacturing systems. Depending on how the store is set up and what it is eligible to use, a developer may use Shopify's Cart Transform Function API and related bundle capabilities.
Check every component in the cart, checkout, inventory, and order fulfillment. If the bundle looks right on the product page but the order records contain the wrong items, the setup still needs work.
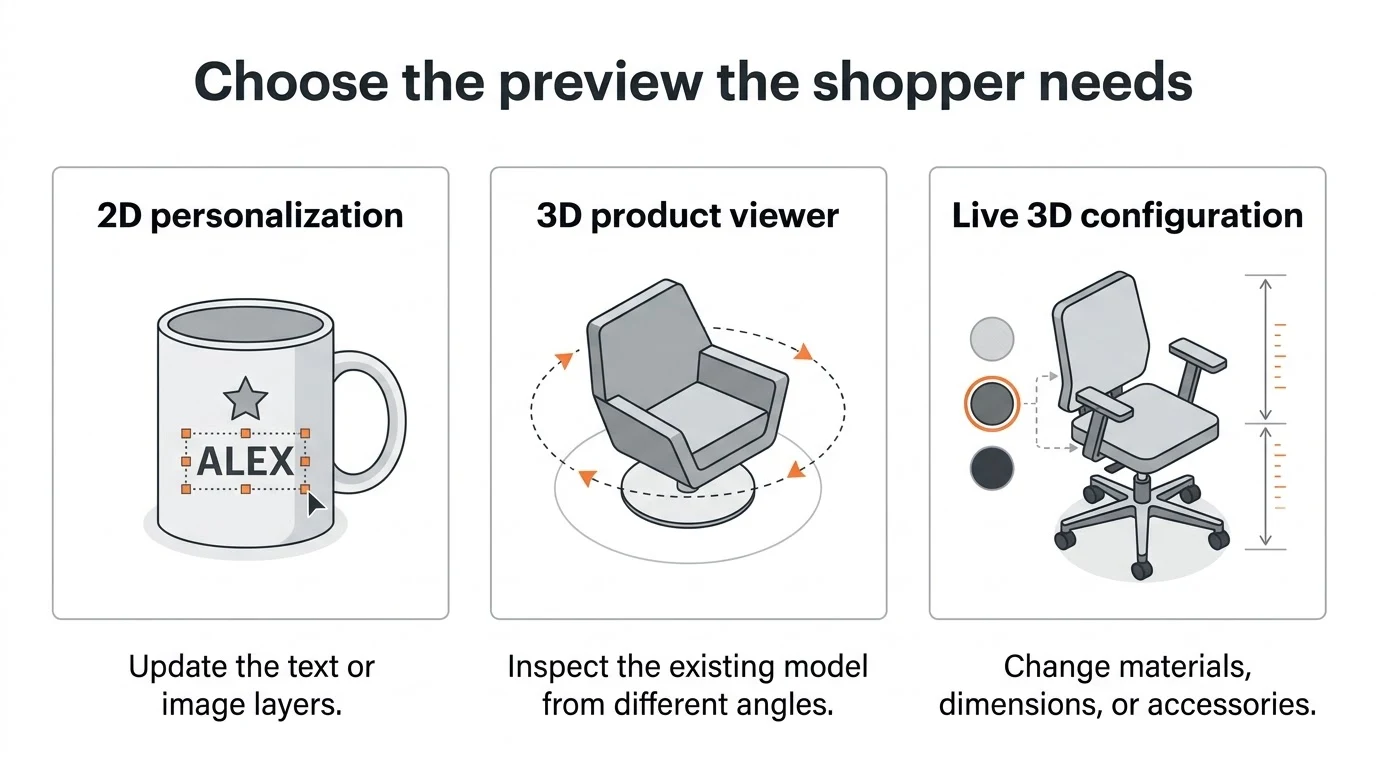
4. When Do You Need a 2D or 3D Product Preview?
For some products, a text field or an option picker only solves part of the problem. A furniture store might want the customer to pick a sofa color and see the sofa change immediately. A jewelry store might let the customer pick the material for a ring and enter engraving text, then show the result in a preview.
I would split these requirements into 2D and 3D previews because they involve different work.
2D Product Configurators
A 2D configurator generally uses product images or visual layers. If you sell personalized mugs, you can show the mug with a text overlay that updates as the customer types. If the product comes in several colors, you can swap the preview image when they select another color.
JavaScript and CSS may be all you need for a simple preview. If you need to render text, graphics, or several image layers together, you might use the HTML Canvas API.
It takes more work if the preview has to produce print-ready artwork for manufacturing. You may have to save the final design as a separate file, link it to the order, and validate it before production.
3D Product Configurators
With a 3D configurator, the customer can inspect a model of the product and, in some setups, change how it looks. Shopify supports 3D product media on compatible storefront themes, so customers can rotate a model and view it from different angles.
That covers a product viewer. If the customer needs to change the material, dimensions, accessories, or components in real time, you may need a custom renderer or a specialized third-party tool. A custom build might use Three.js or Google's model-viewer component. The choice depends on whether you only need to display the model or also need to manipulate its materials and geometry.
If the store only needs a rotatable model, I would try Shopify's supported 3D media first. I would recommend custom 3D development when the customer needs an interaction that the viewer cannot handle. Building a complete custom 3D engine for a basic viewer adds complexity now and gives you more code to maintain later.
5. How Do You Handle Custom Prices and Discounts?
A customer's choices can change what they should pay. Suppose you sell a personalized gift box. The customer can select premium packaging, add more items, or choose a special engraving service. Each of those choices may increase the final price.
Other stores need to apply a discount when someone buys a particular combination of products. There are several ways to set these rules up. The first thing I would check is whether the requirement changes the product price, the way cart lines are represented, or the discount the customer receives.
Can Line Item Properties Change Product Prices?
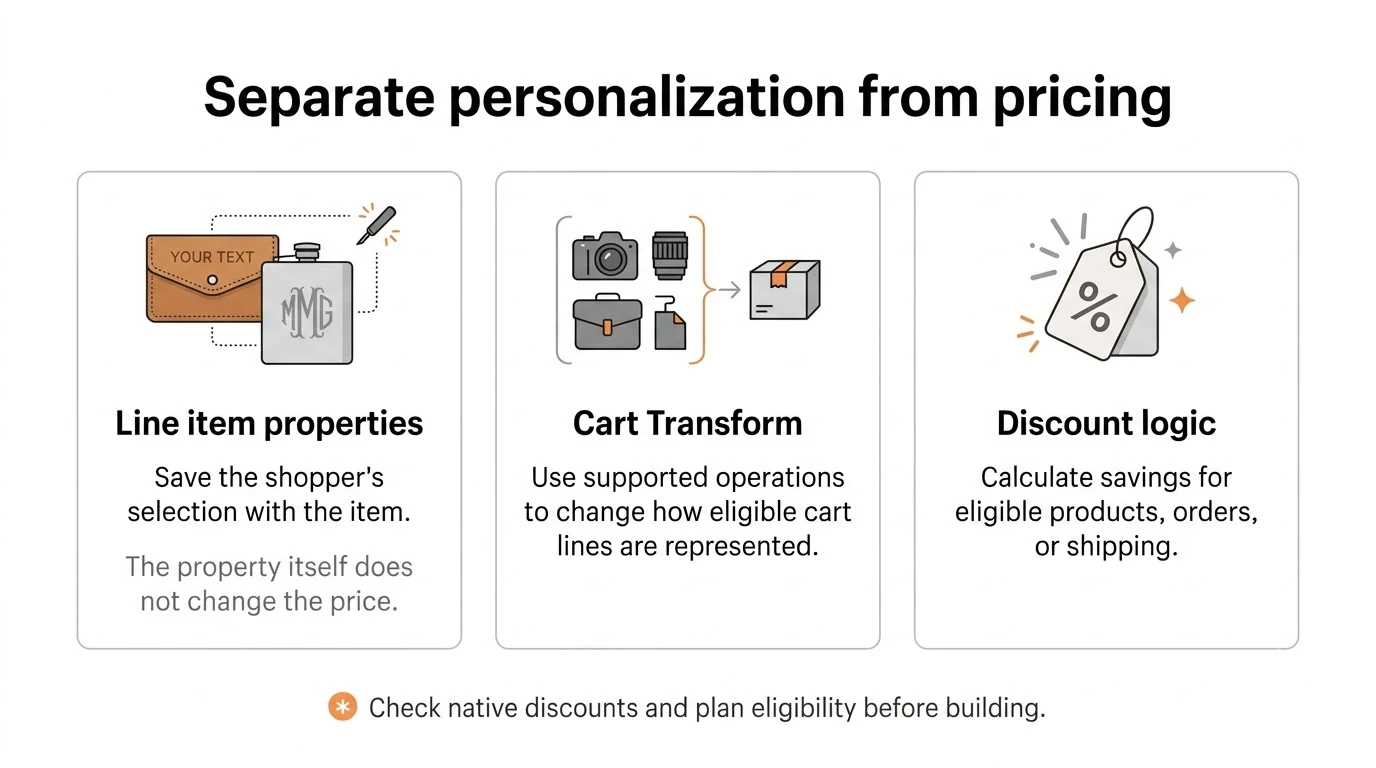
No. A line item property stores information with the product. Shopify does not automatically charge more at checkout just because the line has an extra property.
For example, you could submit this input with the product:
<input
  type="hidden"
  name="properties[Premium packaging]"
  value="Yes"
>
That records that the customer selected premium packaging. If you need to charge for it, you also need a pricing mechanism that Shopify supports.
You could use an options app that supports paid add-ons, represent the charge with a separately priced product or variant, or use an eligible custom pricing implementation. Which one makes sense depends on how you need to handle inventory, tax, checkout, and the order.
You can update the price the customer sees on the product page with JavaScript, but that only changes the display. Check what Shopify actually charges at checkout before relying on the setup.
Shopify's Native Discount Combinations
Before writing custom discount logic, check what you can set up in Shopify Admin. Under Discounts, you can configure supported combinations of product, order, and shipping discounts. What you can combine depends on the eligibility and combination rules.
For standard promotions, those settings may cover the whole requirement. Check the official Shopify documentation on combining discounts for the specific restrictions.
Shopify Functions: Cart Transform vs Discount Functions
Shopify Functions let developers customize certain backend commerce processes using the APIs Shopify supports. Which Function API you use depends on what has to happen.
Cart Transform mainly works with cart lines. For example, you can use it to expand a bundle into its components, merge applicable lines, or update supported fields for how a line looks and what it costs.
Discount Functions work out which products, orders, or shipping options qualify for a discount and how much the customer saves in each of those discount classes.
If you need to apply a discount when certain conditions are met, I would usually start with the Discount Function API. If the configurator needs to change how components are represented in the cart, Cart Transform is the better fit.
Check what your Shopify plan allows before choosing either approach. Stores on eligible non-Plus plans can use Functions through public Shopify App Store apps. To deploy your own custom app containing Shopify Function APIs, you need Shopify Plus.
What Happens When a Function Fails?
A custom Function runs in a restricted environment. The input query, the structure it returns, and the resources it uses all have to meet Shopify's API requirements.
If it returns an invalid operation or runs into an execution error, the transformation or discount you expected may fail to apply. Whether checkout is blocked depends on the Function API, the operation, and the type of error.
That is why I would test custom cart and discount logic with different combinations of products, unavailable items, subscriptions, and cart states you weren't expecting.
My recommendation: Start with Shopify's native discount features. If you cannot configure the rules there, test an existing App Store app. I would build a custom Function when the rules are specific enough that neither approach can apply them correctly.
References:
6. Should You Use an Existing App or Build a Custom Configurator?
For most Shopify stores, I would check Shopify's built-in features and the available apps before paying for custom development. They cover a lot of the common requirements.
This gets harder when you need several apps to make one feature work. You can end up with more dependencies than the feature needs, an order that's harder to process, or a setup that still cannot do what you asked for.
Here is how I would choose based on what the store needs:
| Requirement | Recommended approach |
|---|---|
| Standard size, color, and material options | Shopify native variants |
| Display additional product information | Metafields and metaobjects |
| Customer engraving text | Line item properties or an options app |
| Multiple optional fields with conditional logic | Existing product options app |
| Additional product choices represented through separate products | Combined Listings, where eligible |
| Fixed product bundle | Shopify Bundles |
| Customer-created mix-and-match bundle | Existing bundle app or custom development |
| Standard rotatable 3D product model | Shopify product media |
| Advanced 2D/3D live configuration | Specialized app or custom development |
| Standard combinable promotions | Shopify native discounts |
| Complex discount rules | Eligible Functions-based app or custom development |
| Configurator connected to manufacturing or ERP | Usually custom integration after checking available connectors |
Start with what the store needs to do. A custom build may give you more control, but that only helps if you need that control for the requirement in front of you.
7. Can You Build a Product Configurator Using AI Coding Agents?
More store owners are looking at AI coding agents as another way to build custom Shopify features. Two tools you can use for development are:
You give the agent instructions, and it can help write Liquid templates, JavaScript components, CSS, and the code needed to connect to other systems. For a small feature like an engraving field or a basic image preview, that can save some development time.
I would review and test the code before putting it on a live store. A configurator can look fine on the product page and still fail when someone switches variants, uses quick-buy, adds the same product with different configurations, or goes through checkout. If the agent changes the wrong form or JavaScript component, it can also break something the theme already does.
I would get a developer to review more complex work, especially inventory synchronization, pricing that affects payment, Shopify Functions, or a connection to manufacturing. Those cases also need proper testing. An AI coding agent can help write the feature, but the same Shopify platform restrictions apply and you still need to test the whole purchase flow.
8. What Should You Check Before Launching a Custom Product Configurator?
Before you install an app or publish custom code, check what happens after the customer leaves the product page. Follow the product through the purchase and make sure the customer's selections make it all the way through.
These are the checks I would run:
- Product options: Can customers make valid selections, and does the configurator prevent them from choosing combinations that aren't available?
- Cart: If you add the same product with two different configurations, does the cart keep the details for each one?
- Pricing: Does Shopify charge the expected price for that configuration at checkout?
- Order details: Can the staff handling the order see every customization they need?
- Inventory: Does Shopify track the right variants or products that make up the bundle?
- Mobile: Can someone use the full configurator on a smaller screen?
- Performance: Is the configurator loading scripts it doesn't need or large assets that could be avoided?
- Integrations: Can the fulfillment, manufacturing, or ERP system get the information it needs?
Run these checks with your theme's AJAX cart, variant picker, and dynamic product sections. If the store also uses a third-party app for upsells, bundles, or subscriptions, make sure it works alongside the configurator before you launch.
The options can look right on the product page while the order is missing details. Check the order itself so you know the customer's selections made it through correctly.
Final Recommendation
A Shopify custom product configurator can be a field for engraving text. It can also be a 3D product builder that sends information to a manufacturing system. How much you need to build depends on what Shopify and the available apps already cover.
For simple product options and personalization, I would start with Shopify's native features or try an existing product options app. For fixed bundles, check Shopify Bundles before paying for a separate app.
I would consider custom development for more advanced configurations, live previews, pricing rules that existing tools can't handle, or a connection to an external system.
Before you choose how to build it, write down what the configured product needs to do in the cart and at checkout. Decide how it should affect inventory and what needs to appear on the order. That helps you catch cases where the product page looks right but the people fulfilling the order don't have what they need.
If the available Shopify apps cannot handle your configurator, contact Scalefront. We can go through the requirements and work out which development approach fits.
Technical References
Scalefront Team
The ScaleFront engineering team designs and builds bespoke Shopify themes, apps, and headless architectures for scaling DTC brands.
Speak with an architect →Need Custom Shopify Architecture?
We engineer bespoke Shopify themes, private apps, and headless storefronts designed for speed and conversion.
Related Articles

10 Best Shopify Subscription Apps for 2026 Compared
Real comparison of top Shopify subscription apps. Appstle vs Recharge vs Loop - pricing, features, support. Find the best app for your subscription business.

Build a High-Converting Furniture Shopify Store (2026)
Learn how to create a furniture ecommerce store on Shopify with AR visualization, 360° views, and room planning tools. Reduce returns by 40% and increase conversions.

Create High-Converting Pages with GemPages: Full Guide
Learn how to create custom landing pages, product pages, and collection pages with GemPages. Step-by-step guide with optimization tips and real examples for Shopify stores.